I recently created a wordpress installer using IzPack and uploaded the source code on Google Code. It will 1.) Download wordpress source code, 2.) copy wordpress folder into any directory (usually its the www directory) and 3.) Create an empty DB into MySql. For all practical purposes in doesn’t do much, however it was a good learning experience of IzPack which i am sharing here. Even the izPack Maven plugin website has some good examples.
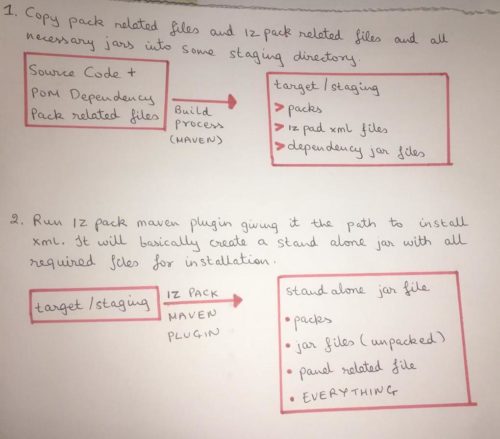
Here’s how the entire build process goes:-
- As soon as you update, http://core.svn.wordpress.org/tags/3.4.2/ is downloaded into externals\wordpress-src. If you’re not sure how this works look at svn externals.
- Compile all your izpack related sources. Add dependencies to pom.xml . Add all dependencies that you need. Include izpack-standalone-compiler for all izpack related classes.
1
2
3
4
5
6
  <dependency>
    <groupId>org.codehaus.izpack</groupId>
    <artifactId>izpack-standalone-compiler</artifactId>
    <version>${izpack-standalone.version}</version>
    <optional>true</optional>
  </dependency>
- Every file that we would need while building (and eventually running) the installer, we would need to copy them into some folder (lets call it a staging folder). We use the maven-antrun-plugin to copy izpack related xml files and wordpress source code. We use the maven-dependency-plugin to copy dependencies.
- Finally, the izpack-maven-plugin is called to create our standalone installer. It asks for the staging folder location which we provide. Remember at this point the staging folder contains everything we need to be packaged in the installer.
- install.xml – Notice how the jar elements are included. You MUST include all the jar files that you would need while running the installer.
1
2
 <jar src="../wordpressinstaller-1.0-SNAPSHOT.jar"/>
 <jar src="mysql-connector-java-5.1.21.jar"/>
In our example we have included mysql-connector-java-5.1.21.jar (remember it’s in the same folder as install.xml, the staging folder) for access to mysql. We also included wordpressinstaller-1.0-SNAPSHOT.jar which actually had all the izpack related components. Since it goes in the target folder which is one hierarchy above the staging folder, we need to use ‘../’. Remember, whatever files we need while running the installer, we need to include using the jar element, just including them in the dependencies in pom is not enough.
Add all the panels in order using the panels element. All these are inbuilt izpack panels. The userinput panels are specified within userInputSpec.xml. The MySqlDetails user input panel will be displayed only if the condition wordpress-izpack-installer.condition.dbinstallation is true (, when checkbox is checked).
1
2
3
4
5
6
7
8
9
10
11
12
13
<panels>
  <panel classname="HelloPanel"/>
  <panel classname="PacksPanel"/>
  <panel classname="TargetPanel"/>
  <panel classname="UserInputPanel" id="SpecifyWebServerDir"/>
  <panel classname="UserInputPanel" id="MySqlDetails" condition="wordpress-izpack-installer.condition.dbinstallation">
    <validator classname="com.validators.MySQLAccessValidator"/>
  </panel>
  <panel classname="SummaryPanel"/>
  <panel classname="InstallPanel"/>
  <panel classname="ProcessPanel"/>
  <panel classname="SimpleFinishPanel"/>
</panels>
The packs panel displays a list of all the packs declared in the install.xml, in this case just one option of copying the wordpress source code will be displayed. The dir=”wordpress-src” is releative to the staging directory where we have copied the wordpress-src during our build process.
1
2
3
4
5
6
<packs>
  <pack name="Wordpress Sourcecode" required="no" >
   <description>Wordpress source code!</description>
   <fileset dir="wordpress-src" targetdir="${wordpress-izpack-installer.variable.wwwdir}/${wordpress-izpack-installer.variable.wordpressfoldername}" />
  </pack>
</packs>
The InstallPanel actually copies all packs data to respective folders when installer is run. The ProcessPanel calls all the processes from the ProcessPanel.Spec.xml one after the other. Usually creating services, creating and running db scripts etc is done here. Validators are used to make sure users enter correct information while installation. We have added a MySQLAccessValidator to the panel, to validate the mysql connection when next is clicked. izPack documentation of validators.
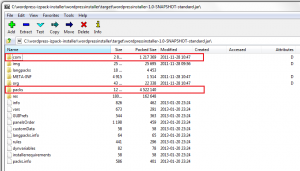
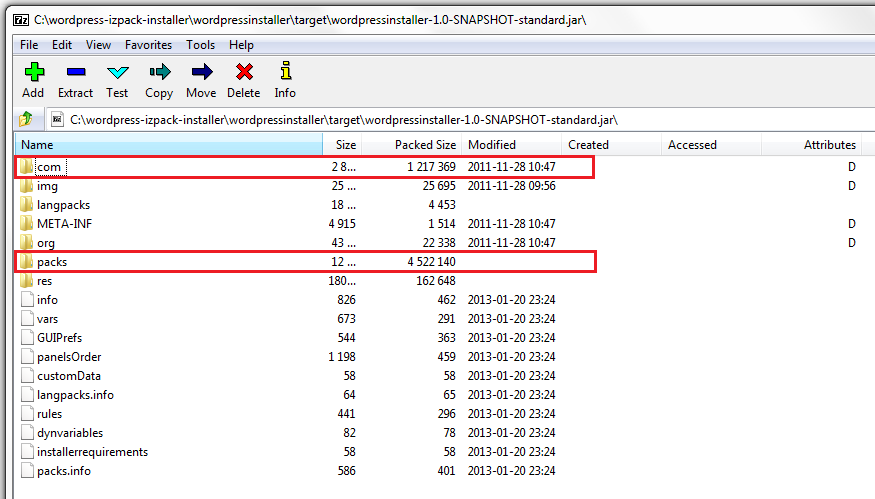
- When the standalone jar is built it literally packages everything within itself, all packs, all necessary jars (unpackaged) etc. Thus, while running you dont need to package anything else except that jar itself.
IzPack workflow on paper:-